Wednesday, January 7, 2015
Children are the pickiest eaters!!!
The joys of Magnatiles!
For parents out there who have not yet experienced the joys of Magnatiles, I urge you to buy a set. While a set of Magnatiles are not cheap, they are without a doubt the best "toy" a preschooler can have and in fact my two daughters have these in their preschool classrooms.
What are Magnatiles?
A set of Magnatile will set you back between $100-$200 and each contains colourful sturdily built plastic magnetic tiles in various shapes and sizes that can be used to magnetically connect to each other to build amazing structures and shapes.
Our set was obtained from an educational stored called Lakeshore Learning and it has honestly kept my three children (yes even my 19month old) happily occupied for hours.
I still remember when my second daughter received a set from a good friend of ours for her second birthday. My older daughter immediately hijacked the gift and sat in her room playing alone with the tiles, having fun building grand structures - and even more fun breaking them down and watching them collapse to the ground with one quick swoop and plastic-y sounding crash!
In fact, this very process of building and then demolishing tiny masterpieces was what enabled my older children to enjoy the Magnatile with their baby brother! The girls would create fantastic forms (sometimes spending much time and effort on impressive structures) and then they would beckon their baby brother over to break it. He would teeter over and relish in the joys of destruction the way only a baby can. Repetively, my children would be so entertained by this simple and fun "game" they had invented. And so it made me realize that the joys of these tiles are not just in its construction but also in its destruction!
There aren't many child-friendly activities that offer children pure entertainment both whilst playing independently as well as with others. This is the appeal of Magnatiles - that children can enjoy building things out of the tiles alone but they can also receive an great amount of satisfaction building (and breaking) the same structures with others. I've seen my daughter sit and build alone quietly while her sister completed a jigsaw puzzle and at other times, they work beautifully together to build 'castles', 'Arendelle', or a spaceship!
So what do children learn from Magnatiles? Geometry, angles, fundamentals in construction, magnetics, gravity, form, puzzle building!
My four year old daughter has been enjoying the Magnatiles for almost two years and it has been fascinating to observe how even the way she plays with the Magnatiles has evolved. In the beginning as a young 3 year old, it was all about the shapes and colours. Could she group all the squares together and build one block? Could she made turrets out of all the triangles isosceles?
Then over time, she gained a more sophisticated approach to the use of the tiles. She started making patterns, putting two triangles together to make squares, or using other shapes in general to create new shapes. She would play with the colours of the tiles and test out angles and non-standard shapes.
More recently as a 4.5 year old, she is playing with challenging forms, pushing the limits of gravity and playing with force and tension to introduce bends and changes in angles to basic shapes. She thinks outside of the box more and more each day and it shows in her creations. Her pieces are unpredictably interesting and awe-striking. Occasionally, she has elaborate and imaginative stories to accompany her structure, which shows that her thought process is so much deeper than the superficial creation of a 3D shape. These tiles are just wonderful!
If you don't have a set, go out and buy it today! Ps this is not a paid or endorsed advertisement!! Just advice from one parent to another!!
What are Magnatiles?
![]() |
| The first day my then-3 yr old played with the tiles, 2013 |
Our set was obtained from an educational stored called Lakeshore Learning and it has honestly kept my three children (yes even my 19month old) happily occupied for hours.
I still remember when my second daughter received a set from a good friend of ours for her second birthday. My older daughter immediately hijacked the gift and sat in her room playing alone with the tiles, having fun building grand structures - and even more fun breaking them down and watching them collapse to the ground with one quick swoop and plastic-y sounding crash! In fact, this very process of building and then demolishing tiny masterpieces was what enabled my older children to enjoy the Magnatile with their baby brother! The girls would create fantastic forms (sometimes spending much time and effort on impressive structures) and then they would beckon their baby brother over to break it. He would teeter over and relish in the joys of destruction the way only a baby can. Repetively, my children would be so entertained by this simple and fun "game" they had invented. And so it made me realize that the joys of these tiles are not just in its construction but also in its destruction!
![]() |
| Created by my 4 year old. I love how a simple rectangle develops a pointed end as it rises vertically |
![]() |
| My 4 year old now creates amazingly complex structures. Here, a "simple" box shape is enhanced by an angled addition with triangular spikes and an intriguing way of balancing off the edge. |
So what do children learn from Magnatiles? Geometry, angles, fundamentals in construction, magnetics, gravity, form, puzzle building!
My four year old daughter has been enjoying the Magnatiles for almost two years and it has been fascinating to observe how even the way she plays with the Magnatiles has evolved. In the beginning as a young 3 year old, it was all about the shapes and colours. Could she group all the squares together and build one block? Could she made turrets out of all the triangles isosceles?
Then over time, she gained a more sophisticated approach to the use of the tiles. She started making patterns, putting two triangles together to make squares, or using other shapes in general to create new shapes. She would play with the colours of the tiles and test out angles and non-standard shapes.
More recently as a 4.5 year old, she is playing with challenging forms, pushing the limits of gravity and playing with force and tension to introduce bends and changes in angles to basic shapes. She thinks outside of the box more and more each day and it shows in her creations. Her pieces are unpredictably interesting and awe-striking. Occasionally, she has elaborate and imaginative stories to accompany her structure, which shows that her thought process is so much deeper than the superficial creation of a 3D shape. These tiles are just wonderful!
If you don't have a set, go out and buy it today! Ps this is not a paid or endorsed advertisement!! Just advice from one parent to another!!
Tuesday, January 6, 2015
What's for dinner tonight?
Ginger flank steak fried rice!
Buy the best beef you can afford. Slice very, very thin:
In a little more oil, stir fry your favorite vegetables. I used, broccoli, red pepper, carrots, grated and squeezed zucchini, mushrooms, onions, cabbage, green onion and green beans. Make sure you cook things like the onions, pepper and carrots before more delicate items that require less cooking time like mushrooms. Once stir-fried, add soy sauce, salt, pepper, a dash of honey and sesame oil. Do not over cook !
Buy the best beef you can afford. Slice very, very thin:
Marinate for an hour in sesame oil, soy sauce, freshly grated ginger, 4 cloves of garlic sliced, hoisin sauce, honey, vegetable oil. Don't add salt until you start stir frying in your wok. Heat wok to high and add some vegetable oil. Stir fry the beef until just cooked.
Remove cooked flank steak and keep in a dish together with the cooking liquid.
In a little more oil, stir fry your favorite vegetables. I used, broccoli, red pepper, carrots, grated and squeezed zucchini, mushrooms, onions, cabbage, green onion and green beans. Make sure you cook things like the onions, pepper and carrots before more delicate items that require less cooking time like mushrooms. Once stir-fried, add soy sauce, salt, pepper, a dash of honey and sesame oil. Do not over cook !
When the vegetables are almost cooked, add day old cooked white rice, if the rice is dry, you can heat separately with a sprinkle of water in the microwave for a minute or so to revive it. Stir fry still on a high heat.
After a few minutes of stir frying, reintroduce all the cooked flank steak (it should look a little ground or chopped beef and be very tender) and all if its juices and liquid. Stir fry for a few more minutes before adding anything that requires off-heat last minute cooking such as toasted peanuts, chopped cilantro, free onions or sesame seeds.
Sunday, January 4, 2015
The New House!
Well, it's about time I blogged about our new home since we are just about to enter the framing process!!! This has been a project in the works since 2012 and partially explaining my two year hiatus from this blog!! I had my third child and we started this process and I simply ran out of time! But 2015 is going to bring so many new changes and a re-commitment to myself and my writing!
So to recap, we bought our dream piece of land in 2012 when Miss R was only 6 months' old. We just sort of sat on it and didn't do much as we were not yet ready to embark on a big project. All we knew was that this was where we wanted to live and we wanted to build our own family home to raise our children in. Last year, when we had our third child, we soon realized what it meant to outgrow a home.
The current home we were living in seemed to shrink in around us! With no finished basement, no driveway and a very small yard, my 4 year old moved into the guest room that we actually use for guests very regularly and the kids were taking over so much of our main floor. When my Dad visited from overseas in the (bitterly cold) winter of 2013-14, we truly felt the squeeze!
Our current home also has no food pantry! So with three young children who seem to eat everything (and nothing), I have been playing tetris with my available kitchen storage, cramming boxes in here and tins in there. I have been forced to grocery shop three times a week because my small 30" fridge holds a bare minimum and certainly not the 2 gallons of milk we go through in a week!
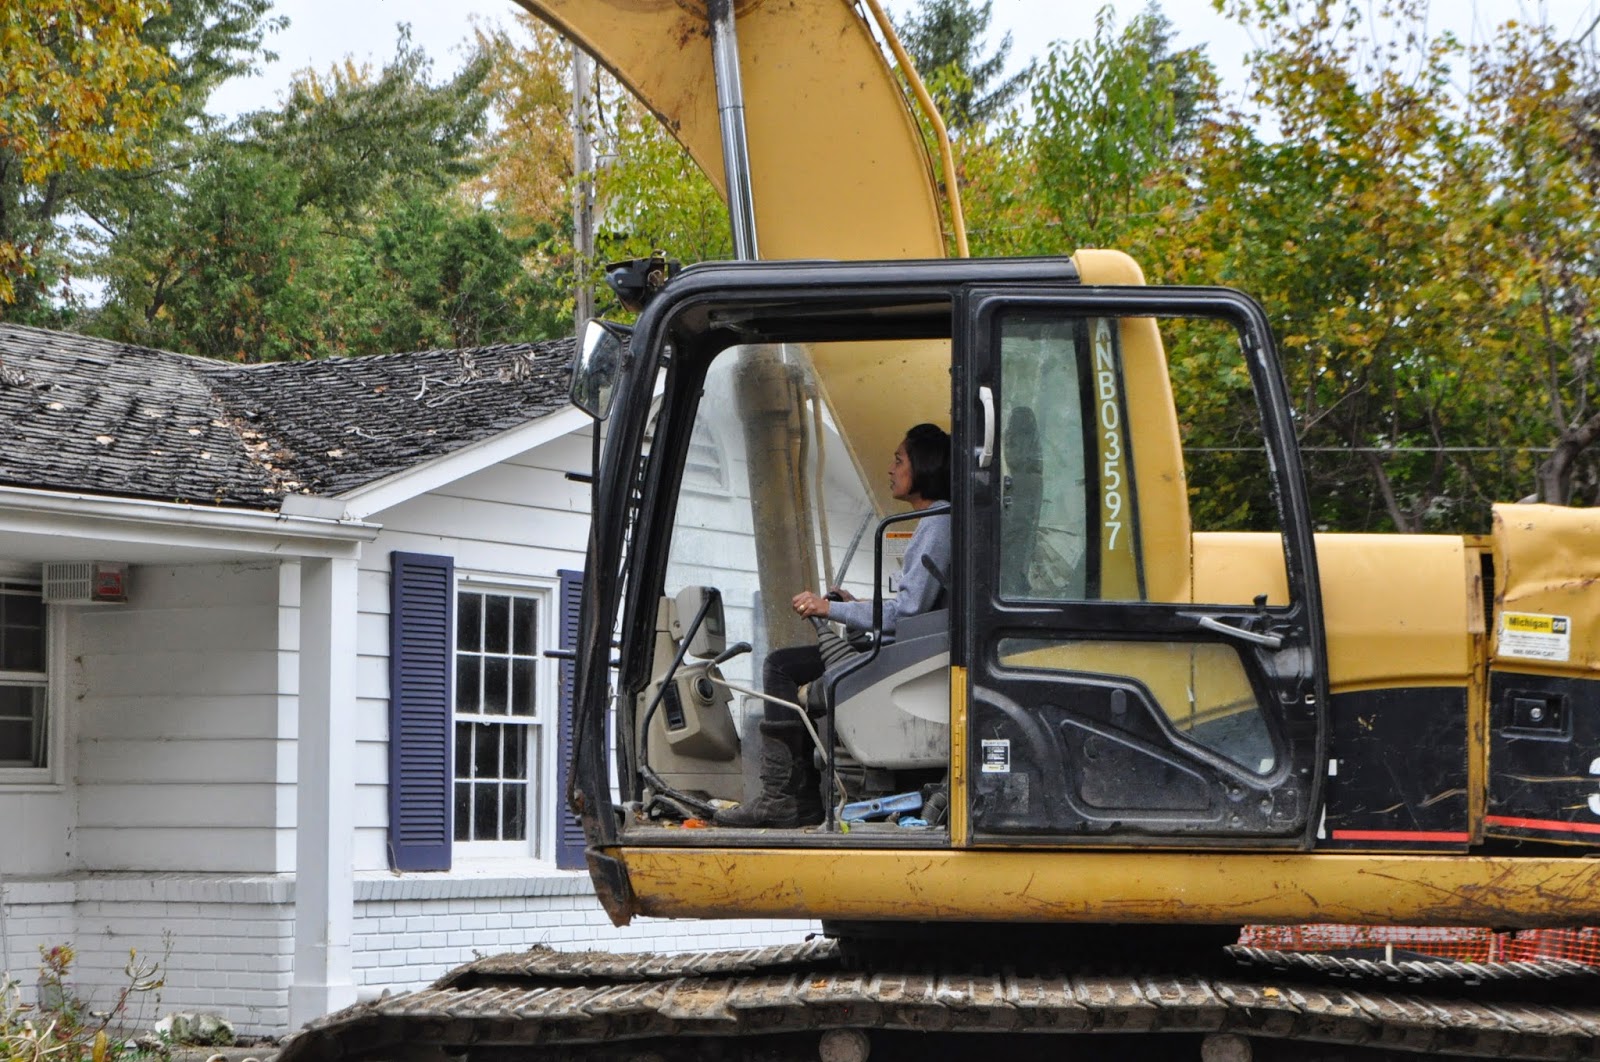
It took us a little over a year (Sep 2013-Oct 2014) from the beginning on the design process to obtaining permit plans but we got there finally, after several engineering hiccups and other delays! Thankfully, the weather here has been mild so far so we were able to demolish the old house in October 2014 when the weather was still in the 50sF. I remember calling my project manager on a Monday to find out when the old house was being torn down and he said, "about 2-3pm". I asked, "today????" "yes today!" So I rushed and pulled out Mini-V from preschool early and we rushed over to the site just as the excavator arrived! The best part was my 4 year-old got to do the first demolition! She sat in the excavator and was not scared. She giggled with excitement as she slammed that claw into the dilapidated roof! I was equipped with my camera and recorded it, priceless!
We watched for about 30 minutes and then we headed home to relieve the nanny and grab the two little ones who were waking from their naps. The four of us enjoyed "the show" and even I got to do some demo work! It was a little nerve racking when the excavator shook with each demo impact!
It wasn't long before JNP arrived and had a blast going for the old garage, reducing it to a pile of bricks and metal. I am sure we hindered the scrap sorting process but boy were we lucky to have made some memories that day!
Since then, it has been fun watching the hole made for the new house, footings erected and concrete poured. We've encountered some further unanticipated complications along the way (bad soil, working with the water table etc) but I am certain it won't be the last.... isn't that what we should expect with any large project?
The weather is now getting cold and the next steps will be framing and getting walls up. I have signed off on the window selection and roof so it won't be long before it starts to look like a house!
We are so excited to start this project! Stay tuned for more updates!
| The new land! Summer, 2014 |
So to recap, we bought our dream piece of land in 2012 when Miss R was only 6 months' old. We just sort of sat on it and didn't do much as we were not yet ready to embark on a big project. All we knew was that this was where we wanted to live and we wanted to build our own family home to raise our children in. Last year, when we had our third child, we soon realized what it meant to outgrow a home.
The current home we were living in seemed to shrink in around us! With no finished basement, no driveway and a very small yard, my 4 year old moved into the guest room that we actually use for guests very regularly and the kids were taking over so much of our main floor. When my Dad visited from overseas in the (bitterly cold) winter of 2013-14, we truly felt the squeeze!
Our current home also has no food pantry! So with three young children who seem to eat everything (and nothing), I have been playing tetris with my available kitchen storage, cramming boxes in here and tins in there. I have been forced to grocery shop three times a week because my small 30" fridge holds a bare minimum and certainly not the 2 gallons of milk we go through in a week!
It took us a little over a year (Sep 2013-Oct 2014) from the beginning on the design process to obtaining permit plans but we got there finally, after several engineering hiccups and other delays! Thankfully, the weather here has been mild so far so we were able to demolish the old house in October 2014 when the weather was still in the 50sF. I remember calling my project manager on a Monday to find out when the old house was being torn down and he said, "about 2-3pm". I asked, "today????" "yes today!" So I rushed and pulled out Mini-V from preschool early and we rushed over to the site just as the excavator arrived! The best part was my 4 year-old got to do the first demolition! She sat in the excavator and was not scared. She giggled with excitement as she slammed that claw into the dilapidated roof! I was equipped with my camera and recorded it, priceless!
| My 4 year with the contractor in the excavator! |
| My turn! |
It wasn't long before JNP arrived and had a blast going for the old garage, reducing it to a pile of bricks and metal. I am sure we hindered the scrap sorting process but boy were we lucky to have made some memories that day!
| JNP climbs in the excavator for his turn... |
The weather is now getting cold and the next steps will be framing and getting walls up. I have signed off on the window selection and roof so it won't be long before it starts to look like a house!
We are so excited to start this project! Stay tuned for more updates!
Tuesday, October 9, 2012
10 Things: I Didn't Know Before Becoming a Parent
(1) I would never need an alarm clock again. Sunday morning, my two-year old woke up at 6:15am. Now, remember I worked as a corporate lawyer for years and I don't remember even waking up this early in those days, except to catch a flight. I think the last time I set an alarm was....um.... before kids??
(2) I would become an expert negotiator. It goes something like this: "How about we color with the crayons after your have put your clothes back on and stop hiding under the dining table?"
(3) I would become a really good liar. I think I told this one today: "<insert name> called me today to find out why you didn't eat your yoghurt. Yes, good girl. I will ring <insert name> and tell them you ate your yoghurt". Today, I used her hand surgeon's name. I secretly hope she doesn't randomly announce to him that she ate her yoghurt at her appointment tomorrow morning...
(4) I would have my hand in so much poop. Literally. The most distant and recent example of this was a couple weeks ago.
Usually when one of my girls have done a diaper blowout, I stand them up in the big laundry sink and use the extendable faucet to wash them down nicely. Of course, before I do that, I have to carefully peal away the diaper and quickly (with one hand) discard it into a plastic bag I store under the laundry sink. Well, first time this ever happened - I was in the process of peeling the diaper off and I lost control of it and it just opened out... plop...plop....plop. My one hand was gripping my Mini-V, the other was now holding an open, half empty poopy diaper and I am staring at what has plopped into the sink. These were my thoughts: "What just happened??...I wish I had gloves... I wish I had another bag... If I blink, maybe we can go back in time... omg I have to use my hand and pick that sh*t up. Literally". And I did.
No amount of anti-bacterial soap will erase that disgusting memory. This is where I remind myself I have two degrees plus a Masters and yet I find myself handling poop all day. So gross. Pregnancy should come with a poop warning.
(5) Children think it's absolutely normal to spit out into your hand whatever it is they have chewed and decided they don't want to swallow. The worst part is they do it in public too. Oh, and if your hand is not freely available, be warned that they will just spit it out on you, the floor, really anywhere. Today, my daughter decided to not finish her pasta and so she just spat it out on my kitchen floor. And then they will use your pants leg to wipe their dirty hands and mouths afterwards.
(6) The diaper bag is now my handbag. I never actually realized when I was pregnant that it would be a long time before I would be reunited with my handbag. I mean every now and then when I am out without the kids of course I leave the diaper bag at home and take a purse but I had no clue before kids that essentially the diaper bag would be all I would carry! I was never a real purse-kinda-gal anyway but I do miss carry around items beyond my "bare essentials" of wallet/lip gloss/keys/gum. I also sorta miss carrying around junk I don't need... toothpicks, restaurant candies I know will never make it to my stomach because of the bag lint attached to it, sachets of sugar, random bobby pins, random receipts shoved in my bag that should be thrown out...
(7) You never get to eat. Parents of 2+ kids, you know what I am talking about. You and your partner tag team eating at restaurants: "honey, you eat first and I will feed the kids and then we can swap"... then you inhale your food the first instance you get because you don't quite know if you will get another five minutes uninterrupted to eat for a while. Sometimes I am so hungry and honestly, I don't get that five minutes just to get even a cracker to tide me over... between the "carry me Mommy!!!!" (whimpering ensues if you attempt to put them down) and then the constant diapering, feeding, crying... I think back to the good old days of one child. Man, those days were good! When she was down for a nap, I had all that time to myself. Now I am just holding out for when I can ship them off the school. Maybe then I will eat.(8) Going to the toilet becomes a spectator sport. Not only does my toddler barrage me with a ton of questions about what I am about to do, but then she wants to be there, watch and get a running commentary during the main event. This is how it goes: "Mommy, you go wee-wee? I'm coming too... Is it big wee-wee? Maybe poo-poo? Did you fart? Was it big poo-poo? Will you wipe now? Can I see it? Can I flush it?". Honestly, you would think I had just given birth to something memorable.
Sometimes I try to trick my toddler just so I can use the toilet alone in peace for once: "Mommy is going to...um... check something...." (quick exit) but this usually follows with tears and the pained wailing of "Moooooommy!! Where are yooooou? Come baaaaaack!" - not worth it, I think having a spectator and answering questions is slightly more tolerable than trying to back one out whilst listening to your child cry and scream for you like they are in pain.
I really miss the days of being able to go to the toilet in peace. Sadly, the few occasional moments I do have the chance to go alone, I tend to drag it out like it is some sort of vacation. I take my phone, have a game all ready to play, or sometimes I keep a nice new catalog waiting for me and then I take my time and sit there for several minutes, just enjoying the solitude. It's really quite pathetic.
(9) It becomes normal to refer to yourself in the third person. I honestly can't remember the last time I used "I" in a sentence with my children. It's always Mommy this or Mommy that. It's so bizarre when you actually think about it. I mean, I know that they know that I am Mommy, so why do we do it?
(10) That just my touch, hug and kiss, has the power to stop tears and make a crying child happy again. Now, that is a gift, maybe even a superpower!
Sunday, October 7, 2012
'Annie' star all grown up!
This came up on my Yahoo browser today and I had to share! Annie was one of my all-time favorite movies as a child. The famous 1982 John Huston musical about an orphan who is taken in by a billionaire bachelor made its main star Aileen Quinn, who played the title character Annie, a recognizable face in every household.
Thirty years on, the movie has been released as a special edition on Blu-Ray and here is the star all grown up!
Aileen Quinn is now a 41 year-old woman! Can you believe it!? I think she looks so different from her photo as Annie - would you recognize her on the street?
Thirty years on, the movie has been released as a special edition on Blu-Ray and here is the star all grown up!
![]() |
| Taken from yahoo.com |
Aileen Quinn is now a 41 year-old woman! Can you believe it!? I think she looks so different from her photo as Annie - would you recognize her on the street?
I am still here!
Once again, I have not been writing for a little while. My sweet little two-year old had a little accident and was in the ER last week, ending up with hand surgery. She is doing great but what a scare, poor little thing. She is still bandaged and on antibiotics but healing nicely.
Between that episode, battling the morning (all day) sickness with this pregnancy (uuuurgh!!) and finally getting possession of our new house, I have had no time at all to blog :(
I promise to write something more current soon! Stay tuned for product reviews coming your way very soon! Happy Blogging!
Between that episode, battling the morning (all day) sickness with this pregnancy (uuuurgh!!) and finally getting possession of our new house, I have had no time at all to blog :(
I promise to write something more current soon! Stay tuned for product reviews coming your way very soon! Happy Blogging!
Thursday, September 27, 2012
10 Things: Fall Garden Preparation
Fall is a nice way to end a leisurely warm summer. The leaves start to change into beautiful crimson and amber shades and then every gust of cool wind seems to leave the streets scattered with pretty fall foliage. House porches welcome back pumpkins, scarecrows, corn husks and bales of hay. It's a time to drink pumpkin spiced lattes, eat caramel apples start planning our upcoming Holiday season.
I really enjoy September, but it is also that time of the year when our yards start to wind down for the year. So here is a checklist of the essentials for this time of the year:
(2) Now is the time to divide any bulbous plants and re-plant. These include hostas and calla lilies. Hostas thrive during Fall replanting because the warm days coupled with cooler nights provide the perfect conditions for strong roots and winter preparation.
(5) If you plan on getting the help, you will need to organize leaf clean-up around the end of October, when most of the deciduous trees have completely finished expelling their season's leaves and before it is too cold. Aim for the very end of the season so you don't need to do this too many times in the year, although expect to rake leaves a couple times to ensure your yard is tidy and in compliance with your city's leaf removal ordinances. Some cities allow you to rake your leaves directly to the curb of your street and a sweeper comes by on an allocated day to collect it. Other towns require you to bag your leaves for curbside collection. Make sure you find out your town's regulations and comply accordingly. Many gardeners will actually take your leaves away with them and re-purpose them into mulch, so that helps too!
I really enjoy September, but it is also that time of the year when our yards start to wind down for the year. So here is a checklist of the essentials for this time of the year:
(2) Now is the time to divide any bulbous plants and re-plant. These include hostas and calla lilies. Hostas thrive during Fall replanting because the warm days coupled with cooler nights provide the perfect conditions for strong roots and winter preparation.
(3) This is also the time to plan your spring garden and plant the spring bulbs - tulips, daffodils, hyacinth, jaunquils. These bulbs do a lot better after having been underground during the winter months so get them into your ground during Fall the year before.
(4) Book your sprinklers to be blown out and winterized. If you live in a climate where you experience sub-freezing conditions, as we do, your sprinklers must be blown out and closed until the temperature is steadily back over about 40F and in time for the Spring's first growth (Usually mid-April). The cost involved is minimal - usually around $30, sometimes less, rarely much more. This needs to be done sometime in early-mid October.
(5) If you plan on getting the help, you will need to organize leaf clean-up around the end of October, when most of the deciduous trees have completely finished expelling their season's leaves and before it is too cold. Aim for the very end of the season so you don't need to do this too many times in the year, although expect to rake leaves a couple times to ensure your yard is tidy and in compliance with your city's leaf removal ordinances. Some cities allow you to rake your leaves directly to the curb of your street and a sweeper comes by on an allocated day to collect it. Other towns require you to bag your leaves for curbside collection. Make sure you find out your town's regulations and comply accordingly. Many gardeners will actually take your leaves away with them and re-purpose them into mulch, so that helps too!
(6) Take stock of your lawn and prepare it for the next season. Have it aerated to break up compressed soil so that water and nutrients can penetrate to the roots and sub-levels, apply a high-phosphorus mix to your soils to encourage Spring turf and cut your grass back for the last time of the season to 1 1/4 inches because disease is less likely to occur with short grass, plus shorter grass tends to encourage leaves to blow away rather than cling to the blades.
(7) Trim any dead tree limbs so that the winter months of snow and wind pose no additional risks to you or your home.
(8) Mulch young plants. The newly planted plants of the season are the most vulnerable in its first winter so you should add a layer of mulch (chopped leaves, weed-free straw or wood chips) after the first frost but before the ground freezes. As mentioned before, I have found added a layer of straw and then protected by burlap to be a great barrier between the new plants and the winter elements.
(9) Arrange now for your upcoming snow removal, or confirm with an existing contractor. Many landscapers provide this service during their down season so check rates and make sure your driveway, front stoop and any other access ways will be adequately cleared during a snowfall. Also make sure these areas will be salted to eradicate icing and ensuring safety. This is especially important if you have regular front door visitors such as postal workers, UPS or a city sidewalk - which must be shoveled and salted by you.
(10) Order your firewood! This is the time to clean out your wood-burning fireplace and chimneys and order your season's firewood. Make sure this is stored properly, with a cover if you need, to keep the wood dry. You should also keep the wood far enough from the house so as to not pose any additional fire risks to your property and to make sure any critters, such as rodents or bugs stay far enough from your dwelling.
Tuesday, September 25, 2012
10 Things: Fun and Easy DIY Halloween Costumes for Kids
Well, it's getting to that time of year when we all need to start planning our Halloween costumes. Whether you're on a budget, or you are like me and don't really want to spend $50-$100+ on a decent halloween costume for the kids, take a look at these DIY options that will take minimal work, plus you can rummage through what you already have and work around these bits and pieces to make a great, memorable and one-of-a-kind Halloween costume for your children.
Without even a single stitch, you can piece together this cute outfit by matching a fall-colored dress with co-ordinating tights and shoes, felt petal collars and headbands with stickers will complete the outfit.
1. Superheros
All you need are come cool leggings and co-ordinating tops, then you can add letters and belts to the outfit and make simple masks and capes using whatever you have around the house.
2. Flower Children
Easy Ways to Serve Cake and Ice-Cream
I found these fantastic tips on how to easily slice cakes and serve ice-cream for parties and I wanted to share them with you because I will definitely be doing this in the future. You can find the article here at realsimple.com
Use unflavored waxed dental floss to make nice clean cuts in your sheet cake. Hold a piece of floss taut between your fingers (it should be about a foot longer than the cake itself). Drag it down through the cake, then release one end and pull the other end out of the cake sideways. Continue to “cut” in a grid pattern.
Apparently you will get more pieces if you slice a round cake this way. Use a long, sharp knife to cut a smaller circle inside the round cake. Cut the outer ring into pieces, then cut the remaining, smaller cake as you normally would, like a pizza. Give the frosting-laden outer wedges to the kids, and reserve the more lightly iced interior pieces for the adults.
I love love love this tip! Why didn't I think of this before?? Save minutes (and your poor wrist) by trading in an ice cream scoop for a knife. Place a cylindrical cardboard container of slightly softened ice cream on a cutting board and cut it in half lengthwise to create 2 half-circles. Turn each portion of ice cream cut-side down. Remove and discard the packaging. Cut each portion crosswise into slices.
To prevent a sticky situation, start scooping before the party starts. Place individual scoops in a cupcake tin lined with paper baking cups and transfer the tray to the freezer for up to several hours. After the cake is cut, remove the scoops from the paper baking cups (or not) and drop them onto the waiting plates.
Slicing a sheet cake
Use unflavored waxed dental floss to make nice clean cuts in your sheet cake. Hold a piece of floss taut between your fingers (it should be about a foot longer than the cake itself). Drag it down through the cake, then release one end and pull the other end out of the cake sideways. Continue to “cut” in a grid pattern.
Carving a Round Cake
Dicing Ice-Cream
I love love love this tip! Why didn't I think of this before?? Save minutes (and your poor wrist) by trading in an ice cream scoop for a knife. Place a cylindrical cardboard container of slightly softened ice cream on a cutting board and cut it in half lengthwise to create 2 half-circles. Turn each portion of ice cream cut-side down. Remove and discard the packaging. Cut each portion crosswise into slices.
Scooping Ice-Cream
To prevent a sticky situation, start scooping before the party starts. Place individual scoops in a cupcake tin lined with paper baking cups and transfer the tray to the freezer for up to several hours. After the cake is cut, remove the scoops from the paper baking cups (or not) and drop them onto the waiting plates.
Sunday, September 23, 2012
Making Pasta Necklaces
Here's an easy activity to do with your toddler on a rainy day at home. Make pasta necklaces! Chances are you will have all the ingredients around your house already, plus this activity helps your child develop his or her fine motor skills and hand-eye co-ordination. Plus, it's fun!
What you need:
What you need:
- large hollow pasta (rigatoni is best, penne will work fine too)
- string or ribbon
- a small safety pin or paper clip
- First tie a knot at the end of the string or ribbon. This knot has to be large enough to block the pasta from falling off the thread.
- At the other end of the string or ribbon, fasten the safety pin or paper clip to use as a threading aid in your pasta.
- Have your pasta handy - make sure it is UNCOOKED!!! Help your child to thread the safety pin or paper clip through the pasta and down the length of the string or ribbon.
- Continue doing this until you are satisfied with the length of the necklace.
- Connect the ends together with a nice knot and bow and allow your child to wear it
Your child is going to love wearing this quirky necklace, especially because they made it! This activity takes very little time, minimal effort and costs hardly anything. It is a great time filler on a day indoors.
Lamb cutlets with a red wine jus
Made this last week for dinner one night. Australian lamb cutlets marinated with rosemary and garlic, served with a red wine jus, buttery mashed potatoes and sauteed garlic spinach.
Subscribe to:
Posts (Atom)